
This article presents a practical, safe approach to finding and eliminating duplicates — even when filenames, formats, and resolutions differ.
Digital duplicates
If you’ve been collecting photos for years, across phones, cameras, laptops, and cloud backups, chances are your library contains far more images than you realize — and many of them are duplicates.
Not only obvious duplicates with the same filename, but subtle ones: the same photo saved at different resolutions, exports from editing apps, copies created during backups or device migrations and recompressed versions from messaging apps. Manually cleaning this up is tedious and risky. Delete the wrong file and you lose the best version forever.
The goal of this project is simple: identify duplicate photos accurately, decide which version is best, and remove the rest — without guesswork or blind deletion.
To eliminate duplicates safely, we first need a reliable way to answer a deceptively simple question: Do these two images represent the same photo? Comparing files directly doesn’t work. Filenames change. Sizes change. Compression changes. Even metadata can make identical photos appear different at the file level. This is where hashing comes in.
How we recognize the same photo
To detect digital duplicates—both identical and visually similar photos—we use a technique called hashing. The term hash originates from old Dutch and English words meaning to chop and mix food, often leftovers, into a stew.
In computer science, hashing follows a similar idea: data is ‘chopped up and mixed together’ and transformed into a fixed-size value. Formally, hashing converts input data of arbitrary size into a fixed-length representation, known as a hash value or digital fingerprint, using a mathematical algorithm.
Hashing is widely used in cybersecurity to ensure data integrity. It also enables fast lookup and indexing—critical for databases and search engines.
Recognizing photos without looking at every pixel
Above, I described hashing as taking a fingerprint of an image. Not a fingerprint that identifies who is in the photo, but one that captures what the image looks like in a very compact form.
A hash is a short numerical summary of a file. Instead of comparing two full images pixel by pixel—which is slow and fragile—we compare their hashes. If the hashes are very similar, the images are probably the same, or at least look the same.
Think of it like this. An image may be 5–10 MB, a hash may be 8bytes. Comparing two hashes takes microseconds. Hashing turns a visual problem into a fast comparison problem.
Why use hashing to find duplicate images?
Because duplicate rarely means bit-for-bit identical in real photo collections. Two photos can be: resized, recompressed, slightly cropped, rotated by camera metadata, exported from different apps … and still be visually the same photo.
Traditional file comparison fails here. Hashing succeeds because it answers a better question: do these two images look the same to a human? Rather than: Are these two files exactly identical?
Same file vs. same picture
Exact hashing focuses on file identity.This is the classic kind of hashing where every single byte matters. Change one pixel —and the hash changes completely. Exact hashing is excellent for finding perfect copies, detecting corrupted files and verifying downloads. It is, however, poor at finding resized or recompressed photos. In photo collections, exact hashing alone usually finds only a small fraction of duplicates.
Perceptual hashing focuses on visual similarity. Perceptual hashing works differently.
Instead of hashing the raw file, it creates a simplified version of the image, extracts visual structure (edges, shapes, contrast, color patterns) and encodes that structure into a compact fingerprint. Small visual changes now cause only small hash differences. This allows similarity, not just equality.

Figure 1: Same file vs. same picture: exact hashing detects byte-identical files, perceptual hashing detects visually identical images
Why compare hashes by distance?
Perceptual hashes are not compared as equal / not equal. Instead, they are compared by how many bits differ. This allows fuzzy matching instead of brittle yes/no decisions.
Similarity is typically measured using the Hamming distance, the number of differing bits between two hashes. A smaller distance indicates greater visual similarity. For example, the distance between 0101 and 1111 is 2—two bits differ.
Limitations
As with every technique, also our hashing approach has its limitations:
- Very heavy crops may no longer be considered duplicates.
- Strong artistic filters can break perceptual similarity.
- Extremely low-quality thumbnails may lack enough structure.
These cases are treated conservatively to avoid accidental data loss
Why not use deep learning?
Deep vision models are powerful but slower, harder to explain, and harder to audit. For duplicate detection, perceptual hashing offers speed, transparency, and deterministic behavior — all essential when deciding which files to delete.
What this tool actually does
At a high level, the duplicate finder performs four steps:
- Scan your photo collection.
Each image is analyzed without modifying the original files.
- Identify duplicates and near-duplicates.
Both perfect copies and visually identical images are detected.
- Group related images together.
All copies of the same photo are clustered into one group.
- Recommend which file to keep.
The highest-quality version is selected automatically.
Nothing is deleted by default. All decisions are reviewable. The script never writes thumbnails or modifies image contents; it only reads files and outputs an audit CSV (and optionally moves duplicates to quarantine).
Finding and eliminating duplicates
To efficiently scan a collection of, say 50,000 images and weed out the low-quality copies, you need an algorithm that is both fast and robust. You can’t rely on a single hash or a single pass. Instead, we use a two-pass strategy.
Two-pass duplicate detection
We’ll use two passes. First an exact hashing pass (using SHA1) that is fast and decisive and catches byte-identical files even if filenames differ. That means it will detect: same image copied to another folder, same image renamed, same image duplicated by backup tools …but it will not match recompressed or resized variants.
That’s perceptual hashing’s job. So a second, perceptual hash pass is needed to catch visually identical or near-identical images (resized, recompressed, etc.). Next we’ll look into the techniques that are used to this end.
Finding photos that look the same
A perceptual hash typically follows this pattern. First, normalize the image, rotate it correctly (using camera metadata) and resize it to a small, fixed size. This ensures you treat all images equally. Second simplify the image, for instance convert to grayscale, reduce noise, and fine detail. Third, extract visual structure: edges, shapes, repeating patterns or coarse color balance. Fourth, encode that structure into a compact binary pattern. Similar images will produce similar patterns.

Figure 2 Perceptual hashing pipeline: images are normalized, simplified, and reduced to structural fingerprints.
Why use multiple perceptual hashes?
Our script uses multiple perceptual hashes because no single ‘view’ of an image is perfect. Different perceptual hashes focus on different visual aspects—much like human vision does. Using more than one hash is like asking multiple witnesses the same question.
The main perceptual hash types
dHash – Focus on outline & geometry. Captures brightness changes between neighboring pixels. Extremely fast and effective for resized or recompressed images.
pHash – Focus on overall shape & composition. Looks at low-frequency patterns and ignores fine detail. Robust against noise and small edits.
wHash – Focus on texture & rhythm. Looks at wavelets to capture structure at multiple scales. Complements pHash and dHash. Excellent for resolving borderline cases.
colorhash – Focus on color palette. Captures coarse color distribution. Useful as a secondary signal when structure alone is ambiguous.
Together, this ensemble keeps false positives low without sacrificing speed.
Below is a simplified excerpt showing how perceptual hashes are computed per image
    # --- hashing ---
    def _hash_one(self, path: str) -> Optional[Features]:
        try:
            im = make_thumb(path, self.cfg.max_side, self.cfg.animated_webp_policy)
        except _SkipImage:
            self.log(f"skip animated webp: {path}")
            return None
        except Exception:
            return None
        try:
            w, h = im.size
            hs = self.cfg.hash_size
            dh = int(str(imagehash.dhash(im, hash_size=hs)), 16)
            ph = int(str(imagehash.phash(im, hash_size=hs)), 16)
            wh = int(str(imagehash.whash(im, hash_size=hs)), 16)
            ch = int(str(imagehash.colorhash(im, binbits=3)), 16) if self.cfg.use_colorhash else 0
            size = os.path.getsize(path)
            # Sharpness from PIL image to avoid cv2 imdecode issues on animated formats
            sharp = 0.0
            if _HAS_CV2:
                try:
                    g = np.array(im.convert("L"), dtype=np.uint8)
                    sharp = float(cv2.Laplacian(g, cv2.CV_64F).var())
                except Exception:
                    sharp = 0.0
            exact = sha1_file(path) if self.cfg.do_exact_hash else ""
            return Features(path, w, h, dh, ph, wh, ch, size, sharp, exact)
        except Exception:
            return None
Why this approach scales to large collections
Hashing enables three crucial things. Speed, millions of comparisons become feasible. Memory efficiency, you compare fingerprints, not images. Clustering, group families of duplicates instead of only pairs. This makes it suitable for personal photo archives but also professional media libraries.
Hashing and clustering form the engine that powers duplicate detection.
Grouping all copies of the same photo
If image A is similar to B, and B is similar to C, do A, B, and C belong together? Clustering answers this question. We use Union–Find (disjoint-set) clustering, which groups images into connected components. If: A ≈ B, B ≈ C then A, B, C form one cluster even if A was never directly compared to C.

Figure 3 Clustering via transitive similarity: if A ≈ B and B ≈ C, all belong to the same group.
Bucketed clustering performance optimization
We reduce comparisons by grouping images into buckets using a coarse hash prefix and only comparing images within the same bucket. This can reduce comparisons from millions to thousands without sacrificing correctness.
Similarity decision: conservative + corroboration
We detect similarity in stages. dHash first,if Hamming(dHash) ≤ threshold, accept. For the borderline zone:If dHash is close but not decisive, require agreement from pHash and wHash. This corroboration strategy significantly reduces false positives.
if dhash_dist <= T1:
    similar
elif dhash_dist <= T2 and phash_dist <= T3 and whash_dist <= T4:
    similar
else:
    different
Keeper policy – Which file do we keep?
From each cluster, we deterministically select one keeper based on multi-criteria ranking. We prefer files based on:
- Max resolution – keep the best source material.
- Sharpness (Laplacian variance).
- File format preference, we prefer RAW/TIFF over PNG over JPEG, etc.
- Bytes per pixel as a proxy for compression quality.
- File size as the final tie-break.
This is practical: tools that don’t pick a keeper create messy manual workflows.
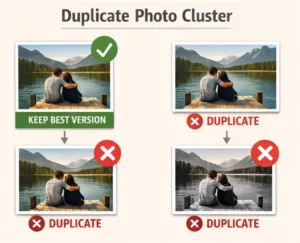
Figure 4 Duplicate photo cluster: multiple versions of the same photo grouped together, with one high-quality keeper selected automatically.
Why this approach is safe
We use several built in safeguards:
- You don’t modify original files.
- Deletion is optional and reversible.
- Decisions are based on multiple independent signals.
- Results are auditable via CSV reports.
We designed the system to reduce risk, not to maximize aggression.
Duplicate detection isn’t about clever algorithms — it’s about confidence.
Confidence that you’re keeping the best version of your photos. You loose nothing valuable. You can clean up a messy archive.
Hashing, clustering, and scoring are simply the tools that make that confidence possible.
Safe execution: dry-run, quarantine and audit CSV
You don’t deleted blindly. Default behavior is dry-run. We can move files marked for removal to a quarantine directory. Every run produces a CSV report with the keep/drop decisions (recommendations), so you stay in control.
Dual-mode integration (CLI and GUI PyQt)
We structured the script so the same engine runs as a command line tool and also as a PyQt6 worker inside a GUI application. One engine, multiple front-ends — a key architectural goal of the Person Recognition project.
Download Script
